Setting up
Getting Started
Thinkific plan requirement: CheckoutJoy needs Thinkific's external-payment / app-integration features. These are not available on the Thinkific Start plan. You need to be on Thinkific's Grow, Expand, or higher plan for the integration to work. If you've been struggling to make CheckoutJoy connect on a Start-plan Thinkific site, upgrading the Thinkific plan is the fix — this is the single most common onboarding blocker for new Thinkific customers.
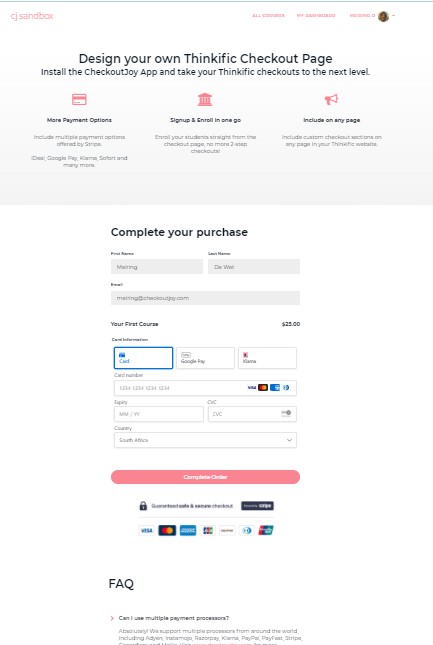
The CheckoutJoy App for Thinkific offers custom checkout sections designed to securely accept payments and enroll students from anywhere on your Thinkific website.
This enables you to:
- Design your own checkout pages using the Thinkific Site Builder. Add any layouts and sections available in your Thinkific website.
- Signup & Enroll in one go. Your checkout page will automatically signup and enroll students to your Thinkific courses and bundles.
- Offer multiple payment options and processors to choose from.
- Sell in any currency on Thinkific, process once-off payments, payment plans or subscriptions.
Plans and Features
CheckoutJoy has 2 plans to choose from. By default the Essential Plan is selected when signing up.
| Feature | Essential Plan | Pro Plan |
|---|---|---|
| Checkout Page | Create a checkout in Thinkific | Create a checkout page in CheckoutJoy |
| All supported payment methods | Yes* | Yes |
| Auto-enroll | Yes | Yes |
| Currencies | All supported by payment processor | All supported by payment processor |
| Dynamic Currencies | No | Yes |
| Sales Tax (w. Quaderno) | No | Yes |
| Custom forms | No | Yes |
| Apple Pay (w. Stripe) | No | Yes |
*Excluding Apple Pay through Stripe
Which plan should you choose?
Choose Essential Plan if you just need a simple checkout with a supported payment processor(s) and different currencies then the *Essential plan is enough to get started.
Choose Pro Plan if you want a more complex checkout - like multiple currencies, automatic sales tax through Quaderno, Zapier integration or to record extra information on checkout like billing/shipping addresses, VAT numbers etc.
See some example checkout pages designed in Thinkific here.
Design your own Thinkific checkout page
How it works
Installing the CheckoutJoy App for Thinkific adds a custom checkout section to your Thinkific Site Builder, which allows you to add a checkout section to any page within your Thinkific website.
Required Setup
Once you've installed the App, you need to complete the following 3 configuration steps to set up your CheckoutJoy account for the custom checkout section:
1. Create/Import your Products
CheckoutJoy needs your product information to correctly charge the customer.
You can simply import your Thinkific products using our import function located under Products.
2. Set up your payment processor details
In the CheckoutJoy dashboard
- Navigate to Settings > Payment Methods
- Select your payment processor and click on Add
3. Create a checkout page in Thinkific
Now that you've set up your products and payment details, you can create a checkout page in Thinkific with the Signup & Enroll Checkout Form.
Now that you've added your section you can edit it to set up your product and payment options.
To see all available configuration options, see the Signup & Enroll Checkout Form help page.
4. Custom Thank-you Pages
Because your checkout is happening outside of Thinkific, you can't use Thinkific's default thank-you pages. The easiest way to get around this is to create a custom thank-you page in Thinkific to use with all your checkouts.
The basic thank-you page contains the following
- A "thank you for buying the product" message
- A reminder to check their emails for any product related information
- A link to the login page to get started.
Tutorials
Adding a Checkout Widget to Thinkific - step-by-step tutorial
Here's a quick tutorial on how to add our checkout widget to a Thinkfic page. Using the widget you have the ability to add a checkout to any page in your Thinkific site, with all of our features included, like multiple currencies, automatic sales tax, Quaderno integration and multiple payment options.
Adding the custom checkout section
Here's a quick tutorial on how to add the custom checkout section to a Thinkfic page.
This is for Essential Plan users
Custom checkout with Quaderno integration for automatic sales tax
Here's a quick tutorial on how to add the custom checkout that integrates with Quaderno to automatically calculate and charge sales tax.
Pricing — configure in CheckoutJoy, not in Thinkific
If you want to offer multiple pricing options on the same checkout (e.g. a one-off "lifetime" price alongside a monthly subscription), configure them in CheckoutJoy directly, not in Thinkific. CheckoutJoy is the source of truth for what the buyer sees and is charged at checkout. Thinkific's role in the integration is course access — not pricing.
A common pitfall is editing prices in Thinkific and expecting them to flow to the CheckoutJoy checkout. They don't. The price change in Thinkific only affects Thinkific's own native checkout (which you're bypassing by using CheckoutJoy).
If a Thinkific-synced product is misbehaving in CheckoutJoy after a Thinkific-side change — wrong access tier granted, stale fields, broken offer link — the cleanest fix is to delete the product in CheckoutJoy and re-import it from Thinkific. That re-establishes the link with the current Thinkific state.
Common onboarding mistake — checkouts built before the Thinkific app is installed
If you've built checkouts and storefronts in CheckoutJoy but the post-purchase access grant in Thinkific isn't working, the first thing to check is whether the CheckoutJoy app is installed in your Thinkific App Store. The Thinkific app is what authorises CheckoutJoy to enrol buyers into your courses — without it, payment can complete but no enrolment ever happens. Install the app from the Thinkific App Store as the first step, then re-test.